In this page you can see some ukuleles that i have made for a range of people, and in a range of styles.
Starting from the last here is a Tenor archtop jazz ukulele made with a solid carved top, I opted not to carve the back too because i felt it might not make the instrument very responsive.
 |
| Carved top view |
Here is a view of the f hole, the shape is loosely based on a Gibson L5.
 |
| F hole close up |
and here is a close up.
all the main components together.
Here the top is glued to the sides with the back now ready for fitting.
Here I'm fitting the neck to the body before glueing the back.
 |
| Body and neck |
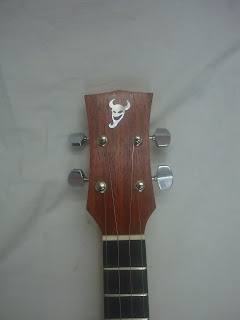
Here the body is ready for the neck, the headstock has my distinctive 'el diablo' logo inlaid in mother of pearl, it just needs the holes for the machine heads
Here the uke is ready for the back glueing process, the clamping cauls are all ready on the bench, the back and sides are figured sycamore with a light flame on it, the central strip is Padauk which was recycled from an old pub bar top, the back has two mahogany braces and a central reinforcement strip.
The back is now on and the clamps securely on.
The padauk bindings are now on the body and the neck is glued on.
And here are a sequence of photos of the finished instrument.
The next ukulele that I have is one that I made for a friend of mine Foz Foster, he owns several ukuleles that i made . The one here is based on a Portuguese instrument from Braga which has a very distinctive rosette.
 |
| Rosette inlay in process |
The inlay process...
 |
| Pins hold in the veneers |
a bit further down the line...
 |
| Ukulele side |
Here the first side has been bent to the template shape all done on an Ibex bending iron.
 |
| Back and sides |
Here are some of the body components at different construction stages,the distinctive orange re coloured wood is African Padauk, all recycled from an old pub bar top.
 |
| Glueing reinforcemnet strip |
Here the central reinforcement strip is being glued on, this helps keep the two sides together strongly.
 |
| Completed back |
Here the back is now complete it has two back braces made of cedrela
 |
| Uke neck |
Here are the early stages of the neck construction.
 |
| Headstock |
Here is the rough headstock with a book matched padauk headstock veneer and sycamore central strip, matching the ukulele back.
 |
| Body construction |
This ukulele was constructed using the Spanish method sometimes referred to as Spanish heel, the body is constructed by first glueing the neck to the top, then the sides are glued on using 'peones' those small brackets and finally the back is glued on, making for a very firm solid construction.
 |
| Channel for binding |
Here the back has been routed in preparation for the binding which were also in sycamore matching the back strip, the heel detail is a typical Andalucian detail done by many Granada and Cordoba makers.
 |
| Back binding glued on |
Here the binding has been glued on using Titebond and held in place using masking tape.
 |
| Bottom bout detail |
Here is the joint of the two sides on the lower bout
 |
| Glueing fretboard |
Here I'm glueing the fretboard on with a variety of clamps.
 |
| Finished but unvarnished |
Here is the ukulele in the white sanded back and ready for applying the finish, I used Tru oil to finish this instrument sometimes called gunstock oil.
 |
| Varnished Ukulele |
Here is the finished ukulele.
 |
| Freshly varnished Ukulele |
|


No comments:
Post a Comment